This post may contain references to products from one or more of our advertisers. Oh Sweet Basil may receive compensation when you click on links to such products.
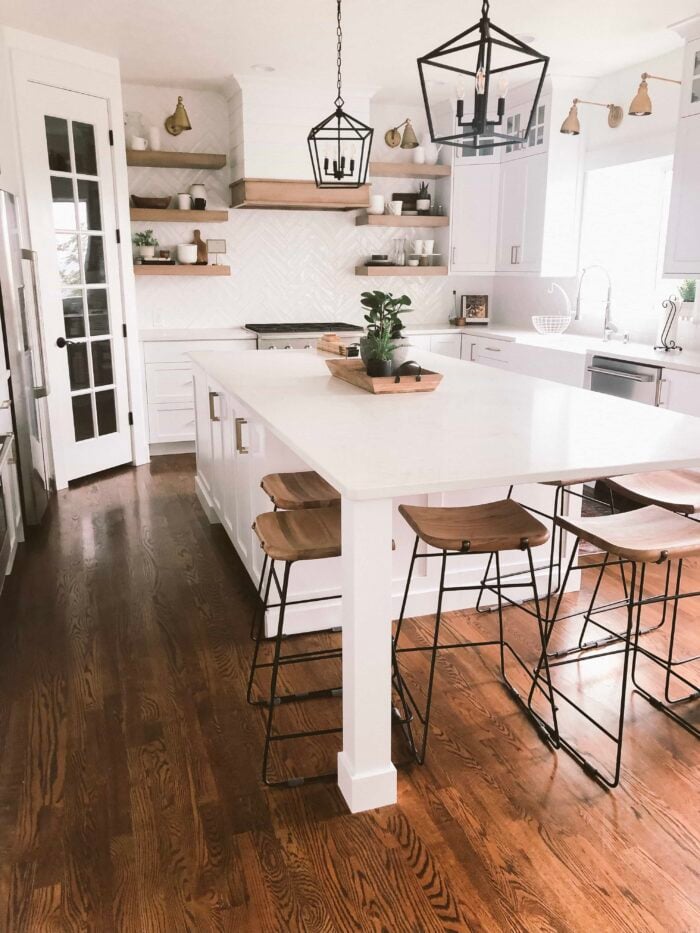
Taking a kitchen from old to new is quite the process, but turning this beauty into an all white, totally organized dream has been worth it.

Never choose to live in your home while you gut and remodel a kitchen and three bathrooms.
Do. Not. Do. It.
Or, if you do choose to remodel, can we give you some advice?
It’s been totally worth it, but it really was a rough process at times and could have been worse if we didn’t have a few things we did right.
At the end of the post you’ll find a list of the contractors we believe are completely worth your time. They showed up on time. Had great prices. Did quality work and not one of them left us hanging or pushed us back.
One of the very first things that people will tell you when you announce a remodel is that it’s going to be a nightmare that takes 10 times longer than you thought. And they would be pretty close to right.

Our kitchen didn’t look bad to a random stop in, but we knew all of its dirty secrets. Every broken one of them.
Let’s just a name a phew things that made us want to start the process.
Oh, haha, no let’s start with the first rule of advice.

- Don’t get it all over with at once.
I see you. I know you’re like us, willing to go through the mud all at once and get it done quickly versus dragging projects out. But guess what, when it comes to a remodel that you’re living in you had better slow your horse down.
Cade gives his permission for me to be saying this, I absolutely did not want to tackle our bathrooms at the same time as the kitchen.
But he did. And when he brought it up for the third time I thought, ya know I’m not going to be that pushy wife, if he really wants to do this then I’ll stand with him.
And I’ll try to be humble and not say that him admitting I was right didn’t feel kind of good. 😉

Ok, back to the kitchen. Let’s start there since that’s what this post is really about. You can tell us if you want to see the bathrooms in the comments and I’ll do another post later.

What we wanted to change:
- The blue walls in the kitchen are hard to see, but they reflected blue onto all of my photos and the paint was extremely poorly done. A lot of coming off of the walls due to the ovens. See next bullet point.
- Our double ovens were shot. Immediately after moving in I noticed that the baking times and temps would often be way off. As time went on one oven totally died and then the other.
- Our ovens were not properly installed on the wall as they could not be opened without totally scraping the paint AND drywall off of the wall in huge chunks.
- The cooktop was starting to go out or would only heat too hot and burn things.
- The island was poorly designed and lacked usable space.
- The cabinetry was all falling apart, peeling and flat out broken and glued back together either by the last owner or one before. The longer we lived there the more we discovered that everything hung crooked and many doors had been broken and merely glued together.

As the list started to get bigger we felt there was not choice but to start over. And if you have to replace two major appliance and cabinetry, well at that point you might as well replace the other appliances and you’ll now need new countertops.
Remodeling is very, “If You Give a Mouse a Cookie.”

Our first task was to gut the kitchen, and then it all became real. We’ve added our list of things we’ve learned and our list of contractors so just scroll through the photos and then take notes!


A few things we learned:
- DO NOT EVER BUY A COUNTER DEPTH FRIDGE. It has been horrible and we had to end up saving our other fridge out in the garage just because we can’t fit enough in. Such a hassle to go out to the garage for half of the stuff we need. But there really wasn’t another option as any bigger fridge wouldn’t have fit. So the real moral of the story is that we need a bigger kitchen someday.
- Put your old cabinets, countertops and appliances on a local site to sell it all and state they have to haul it away. It saves you so much versus paying for the demo to be done. Plus you make money.
- Get a good electrician who can be sure that in pulling everything out you also immediately get set up for the new design; outlets and wiring long enough to be fed through an island (you have to have them in there), ovens, fridge, etc all prepped for and outlets and lights moved wherever you need.
This prep work allows for a smooth next step with drywall etc. Do not wait, get that electrician in there. See below for our personal favorite electrician in Utah.
- Clean often.
When your dry-waller comes to do new dry wall or patch work you’re going to want to have plastic hung to help trap the dust. Nothing will truly help the dust because it’s so fine it goes everywhere, but a little does help.
Next, use your shop vac and broom to clean up once a week or more. Then once the mudding and sanding has been done get your buns in there and do it again then mop.
Trust me on this, plan to clean at some point in order to save your sanity. The constant people and dust in your home will start to drive you crazy.
- Get things ordered now.
Everyone told us to stop ordering hardware, lighting etc but I’m so glad we did so that we could start to plan and prepare for things. Once you get really moving you don’t want to be hung up with 50 home depot trips and looking for that light last minute.
- Maximize space.
Above all else my favorite part of our kitchen is actually behind the scenes. I adore the organization. Everything has its place. Everything is easily accessible for everyone and the things we rarely use are the only things up high.
Our spices are in tiered drawers and the bigger spices are in a large double drawer which hold an insert pull out drawer and more spices hidden inside.
Our cookie sheets went from being at the top of our cabinets to the bottom with built in slots which now holds cutting boards too. I regret it isn’t counter height but we didn’t have a place to put it counter height so it will do.
Add in more drawers than cupboards. You’d be surprised how much more you will use the drawers. Even our plates and bowls are in drawers right in front of the dishwasher for quick and easy unloading that even our kids can help with.
That includes pots and pans. Oh it’s so, so much easier to have them in drawers versus cupboards!
I do wish the faces on our cabinets didn’t have side a big ledge on the trim work. Utah is so dusty and it settles on that which I’m constantly cleaning up.
When choosing to do an all-white kitchen I became worried about how basic it would be. I needed some warmth and contrast but didn’t want much color.
This was achieved thanks to our friend Michelle who suggested warm floating shelves and a tile backsplash that was not just a flat subway tile. Instead it has the smallest amount of texture and it’s a high gloss to contrast those flat cabinets.
We absolutely adore the kitchen. Removing the kitchen table completely and going with a 12′ island was risky and yet it somehow makes the space seem bigger and more inviting. We gather for every meal at that island and head into the dining room for Sunday dinners.
Quick Info-
- Our appliances are GE Cafe line
- Our stools are from Downeast Home
- Lighting by Tyson did our lighting and they were absolutely life saving as I couldn’t find what I liked so they took apart lights and made them for me.
- All other accessories are Home Goods or Target
- Kitchen Faucet is a Moen single spray.
Anything else you just drop a comment and we will respond!
Our List of the Best Contractors in Utah According to Us
Feel free to mention Cade and Carrian.
- Tile- Pedro and Monica (contact Monica)-801-722-8708
- Electrician- Raphael-385-375-4548
- Plumber- Ryan (contact his wife, Sage)-801-592-7831
- Hardwood Floors being sealed again or refinished- Gordon-801-726-7651
- Countertops (we went Quartz and he got us the lowest price and he delivered 24 hours after templating.)- Tevita-801-898-2294
- Painter-Josh-801-712-0191
- Finish Work- Scott Ruitenbeak-209-373-8634
- Contractor- Connor-385-887-2727
- Lighting Fixtures-Tyson- 801-787-5781


Such a beautiful kitchen! I know you have since moved, but I wonder id you’d still be up for answering a few questions about layout?
How did you like the new placement of your fridge? Ours is next to our stove currently and we are considering moving to the same spot you did ! How was that for flow?
And, was it ok to have your island extend out a bit in front of your patio doors rather than flush? We would like to make our island long enough to also go into the space designed to be for an eating space/ table which would visually put it out a ways in front of the sliders .
Thanks!
Hi Michelle! I much preferred it moved away a bit! And I liked it much better extended out past the doors. We sat there for dinner most of the week and the dining room on Sundays and holidays. It was much more convenient for hosting as well. We loved that kitchen!
Lovely! How thick are your floating shelves? We’re trying to decide on 2” or 3” for our kitchen.
Thanks Emily! They are 3″ floating shelves.
Can you tell me the dimensions of your island? I want to do something similar, with seating for 6 on one end. Are you happy with it? Is there enough sitting room? Anything you would do differently? Thanks in advance for your help.
We have since moved so I can’t measure the island but it was 12 ft long and I would say it was a good 5 feet wide, maybe even a little more. And it was absolutely the BEST decision ever. We had a formal dining room for having guests over and it made the kitchen the most amazing hangout, food prep, dinner room etc.
Beautiful renovation! I saw your comment that the island is 12ft long, how wide is it? Also, how has it been, from a traffic flow standpoint, to lose your kitchen table? Considering something similar!
Thank you Bethany! We have since moved so I can’t measure the island but I would say it was a good 5 feet wide, maybe even a little more. And it was absolutely the BEST decision ever. We had a dining room for having guests over and it made the kitchen the most amazing hangout, food prep, dinner room etc.
Beautiful kitchen! I have a similar design in mind for a reno we are doing right now. Do you happen to know the type of wood and color of the shelves and wood on the hood?? It’s exactly what I had in mind!
Hi Amanda! Thank you so much! I have no clue! I’m so sorry!