This post may contain references to products from one or more of our advertisers. Oh Sweet Basil may receive compensation when you click on links to such products.
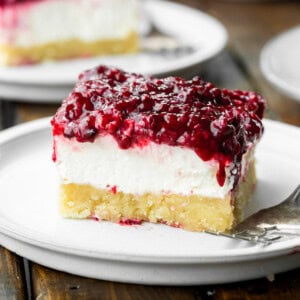
These Berries and Cream Cheesecake Bars are my favorite dessert! The easy oil pie crust pairs with the most delicately sweet cheesecake filling and is topped with a simple berry topping.
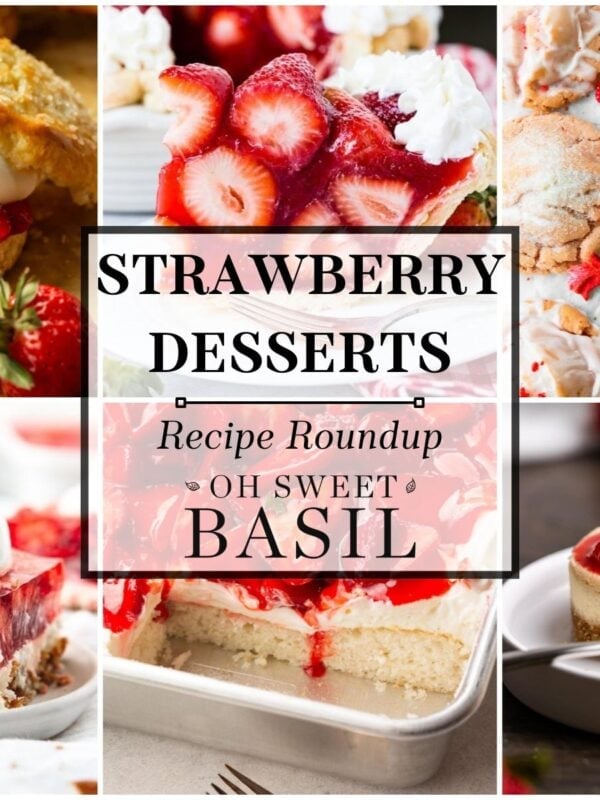
You all know I can’t enough of the berry desserts! Strawberry shortcake is my love language and a marionberry pie is my dream come true! Give me all the berry sweet treats!

Table of Contents
- Oregon Berries
- Ingredients for Berries and Cream Cheesecake Bars
- How to Make Cheesecake Bars
- What Kind of Berries Should I Use?
- How to Cut Cheesecake Cleanly
- Do Cheesecake Bars Need to Be Refrigerated?
- Can Cream Cheese Bars Be Made Ahead of Time?
- Storing and Freezing Cheesecake Bars
- Reasons You Will Love this Recipe
- More Cheesecake Bar Recipes:
- Watch How to Make Berries and Cream Cheesecake Bars
- Berries and Cream Cheesecake Bars Recipe
We’ve teamed up with my dream brand, Oregon Berries to bring you the BEST berry dessert that you will find online this year. I’M SERIOUS. I cannot stop eating it!!
I debated on whether to call these no-bake or not. You bake the crust, but the cream cheese filling layer is no-bake. And I’m telling you, this is a totally unique crust and it’s life-changing!
My friend Megan always tells me about this yummy chocolate pie business, but then she mentioned that there’s a berry version and I couldn’t help it, I needed the recipe immediately. Like, yesterday. And you all should be forever grateful that I got it because this is going to be one of the dreamiest berry desserts you’ll ever devour. In fact, I’m writing this post before I’ve even photographed the recipe because I’m just so excited!

Oregon Berries
Growing up in the Pacific Northwest I had berries written into my very soul! There is no berry quite like the Oregon Marionberry. Oregon was made for growing blackberries- HELLO, optimal soil, air, water, climate and love!
It’s all about the local families who are total stewards of the land, supporting environmentally sustainable practices and always picking at the height of ripeness. And blackberries are actually good for you so you can feel good eating them in multiple ways.
If you’re the wanderlust or bucket list type of person I absolutely insist you make visiting the Oregon coast during the summer appear on your calendar. There is absolutely nothing like the breathtaking drives with music blasting, wonderful friends and conversation in the car and then pulling over to the roadside stands to buy freshly picked berries. It’s my favorite thing ever.

Ingredients for Berries and Cream Cheesecake Bars
I’m going to divide up the ingredients list into what you will need for each layer. Here is what you will need:
Pie Crust Layer
- Flour: just regular all purpose flour is all you need
- Sugar: adds sweetness to the crust
- Salt: enhances all the flavors
- Vegetable Oil: the fat needed to create a flaky strong base for the bars
- Milk: helps bind everything together
Berry Layer
- Berries: for this recipe we are using blackberries and raspberries, but you can use any combinations of berries you want (see section below for suggestions)
- Sugar: adds sweetness and balances the tartness of the berries
- Cornaby’s Ultra Gel: my favorite way of thickening the berry layer, cornstarch can be used as a substitute (see recipe card notes)
- Water: thins everything out to create a beautiful glossy berry layer
Cream Layer
- Heavy Cream: thins the cream layer out a little
- Vanilla: adds flavor
- Cream Cheese: make sure it is room temperature so it doesn’t get lumpy,
- PRO TIP: you can use full fat or 1/3 fat but I do feel like the full fat sets up better
- Powdered Sugar: adds the sweetness to this layer while maintaining smooth creaminess
The measurements for the all the ingredients can be found in the recipe card at the end of this post.

How to Make Cheesecake Bars
I know people can get quite intimidated by making cheesecake, but there is no need to fear with this bar dessert recipe! The crust couldn’t be easier and you don’t even have to bake the cream layer. Here is what you do…
Crust
- Combine the dry ingredients in a bowl.
- In a separate bowl, combine the wet ingrdients.
- Add the wet ingredients to the dry ingredients and stir with a fork until it forms into a ball.
- It will be quite crumbly but it should hold together when it is squeezed. Add tiny splashes of milk if needed.
- Store the dough in an airtight container for at least 15 minutes.
- Roll dough out between two pieces of wax paper into a square and transfer to your baking pan.
- Bake and let cool completely.
Berry Layer
- While the crust is baking and cooling, get the berry layer going by combining the sugar and ultra gel in a saucepan.
- Then add the water and berries and turn the stove on to medium heat.
- Once the berry mixture begins to simmer and thicken remove it from the heat and let it cool. You can also transfer it to a bowl to help it cool more quickly.
Cream Layer
- Start by whipping the cream until stiff peaks form then add the vanilla and mix.
- In a separate bowl, whip together the cream cheese and powdered sugar.
- Combine the cream cheese mixture and whipped cream together and mix on low speed until well combined.
- Spread the cream layer evenly on the cooled crust. Then pour the berries on top and let the bars chill in the fridge until ready to serve.
The detailed instructions can be found in the recipe card at the end of the post. You can also save or print the recipe there.

What Kind of Berries Should I Use?
You can play around with what berries you use. I’ve decided I prefer only raspberries and blackberries (actually, I prefer the marionberry, the best berry ever grown, but they are hard to find here). You can do any combination of these options or snag a bag of the mixed berry blend from Costco which is literally always in our freezer.
- Blueberries
- Strawberries
- Boysenberries
- Raspberries
- Blackberries
- Marionberries
How to Cut Cheesecake Cleanly
We all have been there…you spend valuable time and money making a delicious cheesecake dessert and then you go to cut it, and the knife gets all gunky and the pieces come out all clumpy and ugly. So frustrating!
The key to cutting a cheesecake or cheesecake bars cleanly is to let the bars cool completely. Use a very sharp knife and run it under hot water before making your first cut. Then wipe the knife clean with a paper towel and run it under hot water between each additional cut. It sounds cumbersome, but it will make all the difference!

Do Cheesecake Bars Need to Be Refrigerated?
Yes, cheesecake bars should be kept in the refrigerator. With all the dairy in the cream layer, you don’t want these bars to get too warm or they will start to spoil.
Can Cream Cheese Bars Be Made Ahead of Time?
This is a great dessert to make ahead of time. Since everything is cooled before combining and refrigerating helps them set up even better, they can be made up to 6 hours ahead of time. You can make them in the morning and then store them in the fridge until dessert.

Storing and Freezing Cheesecake Bars
Cheesecake bars should be kept in the refrigerator in an airtight container. They will keep for up to a week.
These also freeze extremely well. I like to cut them into individual pieces and then place them on a baking sheet and stick them in the freezer for about an hour to freeze them. Then wrap them tightly in plastic wrap and then foil. They will keep in the freezer for up to 3 months. Let them thaw in the fridge overnight (or at room temp for a couple of hours) before serving.
Reasons You Will Love this Recipe
- Easy: all three layers are simple to make and there is no baking the cheesecake layer so it’s totally foolproof
- Texture: the cheesecake layer is perfectly smooth and creamy with the texture of the flaky pie crust, it’s heaven in every bite
- Crust: the crust might be my favorite part and is different than most cheesecake bar recipes you’ll find out there. If you’re a die hard graham cracker crust with cheesecake person, go ahead and make follow our graham cracker crust recipe.
- Crowd Pleaser: you can cut the pieces as big or as small as you need depending on the occasion and the number of people you are feeding
- PRO TIP: You can double the recipe and use a 9×13 pan if you have a bigger crowd to feed.

Mixed berry desserts might be my most favorite thing! There’s just something about the tartness of the berries with the creaminess of a cheesecake that makes my tastebuds dance. And the crust is too yummy! You have to try it!
These berries and cream cheesecake bars are like eating both a cheesecake and a berry pie all in the same bite and it’s a match made in dessert heaven!
More Cheesecake Bar Recipes:
- Dulce de Leche Chocolate Cheesecake Bars
- Swirled Lemon Raspberry Cheesecake Bars
- Strawberry Cheesecake Bars
- Snickerdoodle Cheesecake Bars
- Apple Cheesecake Bars
- No Bake Caramel Cheesecake Bars
Watch How to Make Berries and Cream Cheesecake Bars
Berries and Cream Cheesecake Bars
Ingredients
For the Crust
- 2 ¼ Cups Flour
- 1 teaspoon Sugar
- 3/4 teaspoon Salt
- 2/3 Cup Vegetable Oil
- 1/4 Cup Milk
Berry Layer
- 4 Cups Blackberries, frozen or fresh-divided *see note
- 1/3 Cup Sugar
- 2 Tablespoons [Cornaby's Ultra Gel], see note for substitute
- 1/2 Cup Water, see note
Cream Layer
- 1 ½ Cups Heavy Cream
- 1 ½ teaspoons Vanilla
- 12 Ounces Cream Cheese, 1 ½ bricks, softened
- 3/4 Cup Powdered Sugar
Instructions
For the Crust
- Combine flour, sugar and salt in a medium mixing bowl.2 ¼ Cups Flour, 1 teaspoon Sugar, 3/4 teaspoon Salt
- In a separate mixing bowl, combine the oil and milk. Add liquids to the flour and salt mixture. Stir with a fork until a ball forms. There should still be crumbs but press tightly into a ball. Add splashes of milk if it is very crumbly and not at all holding.2/3 Cup Vegetable Oil, 1/4 Cup Milk
- Place in an airtight container and let rest in the fridge for at least 15 minutes.
- Roll out between two pieces of wax paper into an 8×8 square and then transfer into your baking pan.
- Bake in a 350 degree F oven for 8-10 minutes. Set aside to cool completely.
For the Berry Layer
- In a saucepan, stir together the sugar and ultra gel (see note for cornstarch).1/3 Cup Sugar, 2 Tablespoons [Cornaby's Ultra Gel]
- Add the water and berries and stir to combine. Heat over medium heat until simmering and thickening. Turn off and set aside to cool. I like to put mine in a bowl so it doesn't continue to cook.4 Cups Blackberries, 1/2 Cup Water
For the Cream Layer
- Whip cream until stiff and add vanilla.1 ½ Cups Heavy Cream, 1 ½ teaspoons Vanilla
- In a separate bowl, cream the cream cheese and powdered sugar together.12 Ounces Cream Cheese, 3/4 Cup Powdered Sugar
- Add the cream cheese mixture to the whipped cream mixture and beat on low until combined.
- Spread the cream mixture evenly in the bottom of the crust.
- Pour the berries over the top and store in the fridge until you're ready to eat.
Recipe Notes
Nutrition
Nutrition information is automatically calculated, so should only be used as an approximation.

Not too sweet and delightful in pie form! This recipe will make two pies. Freezes well. I’m not a cheesecake fan but I like this. Not too heavy on the cheesecake flavor because I only used one bar, 8 oz. That’s a perfect amount who don’t like too much of that cheesecake flavor, just a hint, and taste more like custard. So light and delightful. Added an additional tsp of Vanilla to the cream layer. Used cornstarch in the berry layer and also used blueberries and blackberries together. Will make again for sure.
Thank you so much for the feedback Patricia! I’m so glad you loved these bars! They are one of my absolute favorites!
Can I substitute for your shortbread crust you use for your wild blueberry bars instead of the crust you used for this recipe?
Hi Lara! Yes, that should work great.
Can you use butter instead of the oil?
Yes, but it will be quite a bit more dry and crumbly as a lot of moisture in butter evaporates while baking.
Thanks and good to know!
I followed the advice in the recipe to double the recipe for a 9″ by 13″ pan and I don’t recommend doubling all ingredients for for that. The crust is ridiculously thick and very hard. I ended up not eating most of my crust because it was so hard. I would recommend making half the crust the recipe calls for, if you still want to make the crust in the recipe. I plan to try this again with my sourdough pie crust for the base, the full amount of cream cheese/whipped cream filling layer, and half the fruit topping because I felt like the fruit layer actually overpowered the cream cheese layer, which was *delicious.*
Thank you for the feedback Natasha!
I really enjoyed the berry topping and cheesecake layer. However, the crust was not great.
Hi Tiffany! Thank you for the feedback and I’m so sorry the crust didn’t turn out! You can always replace with a graham cracker crust if you prefer. https://ohsweetbasil.com/graham-cracker-crust-recipe/
I agree the crust had too much salt and oil, and was too thick. I will be replacing it for a different thinner buttery crust recipe I have. Other than that the cream cheese filling was delicious, will make this filling again!
Thanks for the feedback Cassie!
Why do some other dessert recipes call for the baking pan to be lined with a sling of parchment paper for easy removal but this recipe does not? Will I be able to remove the first few slices without cracking the crust?
Hi Marilyn! That’s a great question! You can definitely add a sling if you want to, but I’ve found that the crust slices really well.