This post may contain references to products from one or more of our advertisers. Oh Sweet Basil may receive compensation when you click on links to such products.
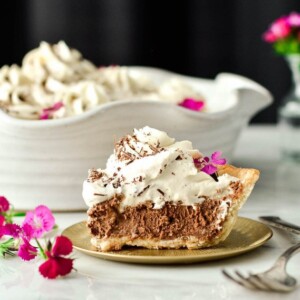
This Homemade French Silk Pie is made completely from scratch! A flaky pie shell is filled with an irresistibly chocolatey cream filling and topped with homemade whipped cream!
The best part? It’s even more delicious than the infamous version from Village Inn {or Baker’s Square for my Midwest-dwelling friends}!

Hello and happy Monday! I’m Laura from JoyFoodSunshine I’m a wife, mom of four sweet kids, and a peanut butter and nap enthusiast! I’m so grateful to be here sharing this Homemade French Silk Pie recipe with all of you!
Growing up, Baker’s Square {or for my Utah friends, Village Inn} french silk pie was a dessert staple in our home! It always made an appearance at Thanksgiving, on my sister’s birthday, and on many other special occasions throughout the year. I truly thought there was no better pie in the universe….until I met my husband!
He told me that his mom made a Homemade French Silk Pie that was even better than the beloved chocolatey treat I grew up eating. My skepticism was sky high, but after I took my first bite I knew there was no turning back! This homemade version is is just as silky and smooth, but it packs a richer, deeper chocolate flavor and is not overly sweet!

My family generally eats pretty healthy at mealtime, but we love our dessert! I’m a firm believer that living a healthy lifestyle does not {and should not} involve depriving yourself of the foods that you love {because what’s life without chocolate right}?! So when I bake delicious sweet treats, like this Homemade French Silk Pie, I make sure to use whole, real-food ingredients that even my 6 year old can pronounce!
That means you won’t find any store-bought whipped topping or packaged pudding in this recipe! From the incredibly flaky pie crust to the fluffy whipped cream to the irresistibly chocolatey filling, you know exactly what you are feeding your family and friends! Plus, homemade always tastes better, don’t you agree?!
This Homemade French Silk Pie is one of my husband’s top 3 favorite desserts! Everyone who tries it asks ] for the recipe as they exclaim that it absolutely is more tasty than any pie you could buy, even from a beloved restaurant!
How do You Store French Silk Pie?
Store the French Silk Pie in the refrigerator.
Is It Safe to Eat Raw Egg?
Ok, I know some people are going to be very concerned about the raw eggs in this recipe that don’t get baked. Rest easy, my friends! Use pasteurized eggs which means the eggs are processed using heat to destroy bacteria like Salmonella and other viruses which means you can use raw eggs in this French Silk Pie recipe without any worry about getting sick.

Homemade French Silk Pie: Method
Since we are making everything from scratch, the order of this recipe is important! It goes likes this…crust, cream, chocolate filling!
Start with the crust!
The crust is the only component of this pie that needs to be baked, so it’s important that you make it first! Also, it needs to cool to room temperature before it gets filled and topped! If you’re in a hurry, you can put it in the refrigerator, freezer or outside on a cold day to speed up the cooling process!
Whip the cream in two separate “batches.”
The filling calls for 1/2 cup of plain whipped cream without any added sugars or flavors, so you will need to whip that first and set it aside. Then make the whipped cream topping and set it aside in an airtight container in the refrigerator. I recommend doing this step before making the filling because it doesn’t matter if there’s a little cream residue on your mixing bowl since it’s already a component of the filling!
Beat the daylights out of the chocolate filling!
To ensure a silky smooth chocolate filling you need beat the filling… a lot! The beating process ensures that the sugar dissolves and the butter and eggs become light and airy!
Why is My French Silk Pie Runny?
Having the eggs at room temperature is crucial for a good result.
The proteins in eggs – which give the filling structure and lightness – are very tight when they are cold and don’t fluff up and stretch as easily.
You’ll definitely get more volume and a better result with room temperature eggs.

Homemade French Silk Pie: Substitutions
I’ma always asked about potential substitutions in my recipes {and I’m sure Carrian gets the same thing here in her corner of the world wide web}! So I thought I’d address a few ways to make this pie a touch simpler, however this recipe is most definitely the best when made exactly as written!
Crust:
Feel free to use your favorite pie crust recipe or even use a store-bought crust to save time. I love the flakiness of all-shortening crusts, and it pairs very well this this light and fluffy Homemade French Silk Pie. However if you’re a sucker for the flavor of an all-butter pie crust, I have used 1/4 cup butter and 1/4 cup shortening with great results!
To make this pie gluten-free you can substitute gluten-free all purpose flour for the regular all-purpose flour in the crust. I have done this with great results!
Whipped topping:
If you’re running short on time you can use store-bought whipped cream for the topping, however I really believe that homemade is always the best!
And that’s really it! I wouldn’t tamper with the filling at all, as it is a tried-and-true recipe that will not disappoint!
Can You Freeze French Silk Pie?
This pie freezes well for up to 3 months. Just thaw several hours in the refrigerator and serve.

More EASY PIE RECIPES:
- Dulce de Leche Banana Cream Pie
- Lemon Jello Peach Pie
- Peanut Butter Banana Cream Pie
- Marionberry Pie
- The Perfect Razzleberry Pie
- Cinnamon Roll Apple Pie
- Easy No-Bake Chocolate Pie
- Peach Blackberry Galette
- Simple Blueberry Pie
- Strawberry Icebox Pie
- No-Bake Lemon Cream Pie
- ALL OF OUR PIE RECIPES!
Homemade French Silk Pie (From Scratch)
Homemade French Silk Pie from Scratch
Ingredients
Crust:
- 1 ¼ Cups All-Purpose Flour
- ¼ teaspoon Salt
- 1 Tablespoon Sugar
- ½ Cup Shortening, chilled
- 3-4 Tablespoon Ice Water
Chocolate Filling:
- ½ Cup Whipping Cream, whipped
- 2 Ounce Unsweetened or Semi-Sweet Chocolate, melted
- ½ Cup Butter
- ½ Cup White Sugar
- Pinch Salt
- 1 teaspoon Vanilla
- 2 Eggs
Whipped topping:
- 1 Cup Whipping Cream
- 3 Tablespoon Powdered Sugar
- 1 teaspoon Vanilla Extract
Instructions
- Make the Crust:
- Very lightly grease a 9” round pie plate, set aside.
- Place the flour, salt, and sugar in a food processor fitted with an “S” blade and pulse to combine.1 ¼ Cups All-Purpose Flour, ¼ teaspoon Salt, 1 Tablespoon Sugar
- Add the shortening and cold water and process until the mixture resembles a coarse meal, begins to stick together, and holds together when pinched.½ Cup Shortening, 3-4 Tablespoon Ice Water
- Remove dough from processor (will be crumbly) and form into a ball.
- Wrap in plastic wrap and refrigerate for at least 30 minutes and up to one day (overnight).
- After the dough has chilled, preheat oven to 450 degrees F.
- Roll out dough on a well-floured surface or pastry cloth and shape it into your prepared pie plate.
- Prick dough with a fork or add pie weights on top of the crust.
- Bake for 10-12 minutes or until it just begins to brown. If any bubbles form, gently deflate them by pricking with a fork or sharp knife.
- Set aside to cool. (You can set the crust in a cool place like the refrigerator to expedite the cooling process)!
- Make the Topping/Whipped Cream for the filling: Whip ½ cup whipping cream (for the filling) in a standing mixer fitted with the whisk attachment on high until stiff peaks form. Transfer whipped cream to an airtight container and set-aside in the refrigerator. Add 1 cup of whipping cream to the bowl of your standing mixer and mix on high until soft peaks form. Add powdered sugar and vanilla and mix on high until stiff peaks form. Transfer to another bowl and set aside in the refrigerator.½ Cup Whipping Cream, 1 Cup Whipping Cream, 3 Tablespoon Powdered Sugar, 1 teaspoon Vanilla Extract
- Make the Chocolate Filling:
- Melt chocolate in the microwave or over a double boiler until smooth. Set aside to cool. Cream butter and sugar with electric mixer for 3 minutes or until the sugar is dissolved and the mixture is light and fluffy. Blend in cool chocolate, salt and vanilla. Add eggs one at a time beating on medium speed for 2 minutes after each addition. Fold in ½ cup whipping cream by hand.2 Ounce Unsweetened or Semi-Sweet Chocolate, ½ Cup Butter, ½ Cup White Sugar, Pinch Salt, 2 Eggs, 1 teaspoon Vanilla
- Putting it together:
- Evenly spread the chocolate filling into pastry crust.
- Top with whipped topping.
- Place in the refrigerator to chill for at least 2 hours or overnight!
- Serve cold and enjoy!
Recipe Notes
Nutrition
Nutrition information is automatically calculated, so should only be used as an approximation.

If you’re still with me I want to thank you again for giving me the privilege of sharing this Homemade French Silk Pie recipe with all you!
I met Carrian a few months ago and I was so inspired by her! I’m grateful for the example she sets by making her family and her role as a wife and mother her top priority as she takes the time to share her life {and her delicious recipes} with the rest of us! I’m glad to know her and can’t wait to get to know all of you!


Blog: JoyFoodSunshine // Instagram: @joyfoodsunshine // Pinterest: JoyFoodSunshine //Facebook: JoyFoodSunsine //Twitter: @joyfoodsunshine
More delicious recipes…

Easy No-Bake Peanut Butter Nutella Cheesecake
This easy to whip up cheesecake is totally calling your name. Hello, there’s peanut butter AND nutella!


Hi, I’m back because I’d like to make this for Christmas dessert, would it be okay to make on December 23rd? I just need another day. Thank you and I wish you all a very Merry Christmas and Happy New Year!
Hi Kris! Yes, That should work great! The crust might start to get a little soggy but it will be delicous!
Thanks so much for replying in this busy time leading up to Christmas. I’m going to make it tomorrow, I really have no other choice. Let’s hope the crust doesn’t go soggy. Merry Christmas and Happy New Year!
It will be great!! Happy Holidays, Kris!
Just finished making this delectable pie, my Mother’s Day dessert! Love making it a day in advance so it gets nice, firm and cold! Happy Mother’s Day to you and all the mom’s out there!
Yay! Love to hear this! Happy Mother’s Day to you!
What make is your white pie pan? Thank you.
Hi Kris! I don’t remember exactly, but this is our favorite shop with similar pans: https://jeffersonstreetceramics.com/
I’ve made this pie several times and we love it. My husband always jokes about my magic pie plate that gets refilled every time it’s empty. Most of the time it takes several days to be emptied, but with this pie, it’s empty overnight. Light, fluffy, and not too sweet.
This is the best feedback ever! Thank you so much Amber!
This pie was ABSOLUTELY AMAZING!! So glad I made it 24 hours in advance to serving! A keeper for sure!! Thank you!
Thank you Kris! SO glad you enjoyed it!
It was quite easy to make and the pie came out great!! It is a must try!!
Thank you! We sure love this pie too!
So happy to hear it’s easy to make! Plan on making it over Labor Day weekend!! It looks absolutely incredible 👍🏻💗
Enjoy! Let us know how it goes!
I wanna try this for thanksgiving here in a couple of days. If I have to drive an hour to my in laws, do you recommend me making it today or tomorrow and freezing it for the ride over there? Also how long does it stay good in the refrigerator for till it goes bad
Hi Amanda! You could make it today or tomorrow and just store it in the refrigerator until you leave for your in laws. Store it in an airtight container and add the whipped cream on top right before serving.
Can you confirm the amount of chocolate in the recipe. Is it just 2ounces? Possibly 12ounces?
2 ounces is correct, that’s all you need!
Hi! I am making this today! Just noticed on crust ingredients it states shortening (no butter at all) and then in the description it states to add butter into food processor. Is there butter in this? I only added shortening…
Oh my goodness! Thank you for catching that! Yes, all shortening, no butter. How did it turn out??
2 oz chocolate?
or
12oz which is a bag of chips.